Categories
Linux

Magicforce Smart 68 key mechanical keyboard – Linux mappings

Given I’m working from home I thought I’d set up a more permanent workspace instead of using a laptop. Doing away with the laptop keyboard I realised that we didn’t have a free standalone keyboard in the house so I went shopping on eBay. After a bit of background reading I decided I fancied trying a ‘mechanical’ keyboard. A distant memory is enjoying using the original IBM PC keyboards (I used the Model F) with their long travel and clicky keys.

I didn’t want a full size keyboard, I have no use for the number pad, its where I want my mouse to be. I really wanted white to match the decor, and I specifically wanted the cursor keys a little separate from the shift / enter keys. There were a few on eBay under my £30 budget but mainly black, or in China and in this case I couldn’t wait that long. So I’ve ended up with a “Magicforce | smart 68 Keys Mini Mechanical Keyboard” as it says on the back, a blue switch model, at £29 delivered. This was 2nd hand but I could see from the pictures that this keyboard was in pretty good condition anyway and these are really easy to clean because all the key caps are designed to come off, to be swapped even.
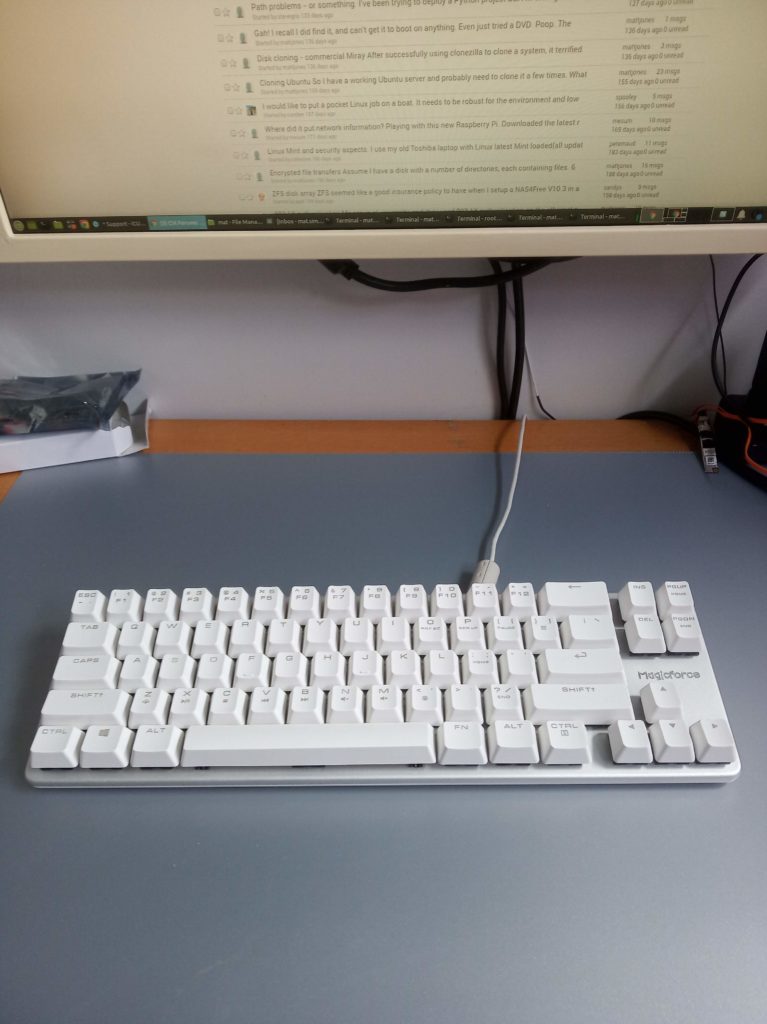
Magicforce Smart 68 key Mechanical Keyboard
After a few days of using it, its a great keyboard, though for the UK it could really do with an extra key. Now I’ve mapped the keys to my liking I can live with this though. I saw that there were some 69 key versions of this keyboard so perhaps this has been addressed already.

Anyway, if you have a keyboard and its not quite working for you, this is how I remapped mine:

I selected a Generic 104 key PC keyboard, with English (UK) layout, though I understand that perhaps selecting a US keyboard maps most keys properly, the UK layout does at least change the Shift-3 to a pound sign.

To backup the existing keyboard mappings:
xmodmap -pke >~/.Xmodmap-original

Use xev to see what key is mapped when a particular key is pressed:
xev -event keyboard -name HoverOverMe -geometry 300x20

If you cannot get the relevant key from xev (like if its not been mapped yet) you can get a list of all the keys / keycodes currently set up, though some of these are wrong e.g. three is 3.:
sudo dumpkeys -l >/tmp/keycodes

Use xmodmap to replace change a keycode to something else.
xmodmap -e "<keycode> = <keysym> <keysym> <keysym> <keysym> <keysym> <keysym>"
The sequence of these mappings is: Key, Shift+Key, mode_switch+Key, mode_switch+Shift+Key, AltGr+Key, AltGr+Shift+Key.
AltGr means the right alt, on this keyboard at least. To skip a column use NoSymbol as the keysym.

On this Magicforce 68 key keyboard using Mint 19.3 xfce4 I’ve done the following:

xmodmap -e "keycode 11 = 2 quotedbl NoSymbol NoSymbol twosuperior"
xmodmap -e "keycode 12 = 3 sterling NoSymbol NoSymbol numbersign"
xmodmap -e "keycode 48 = apostrophe at NoSymbol NoSymbol grave"
xmodmap -e "keycode 49 = NoSymbol asciitilde"
xmodmap -e "keycode 51 = backslash bar NoSymbol NoSymbol numbersign"
xmodmap -e "keycode 66 = NoSymbol Caps_Lock"

Yes, I rarely use CAPS (what is the point of it – a conversation for another day) and I tend only press it by mistake, so this makes CAPS only work with SHIFT-CAPS. Shame to lose all that keyboard real-estate but mapping another key to it doesn’t make sense to me. Shame though because on this keyboard there is a cool green backlight under the key.

To save the layout use the command:
xmodmap -pke >~/.Xmodmap

Make these mappings go live at startup (there are lots of ways to do this, this seems the easiest, you could make it a systemd service or something though).

cat > ~/.config/autostart/keyboard-mappings-MF68.desktop <<EOC
[Desktop Entry]
Encoding=UTF-8
Version=0.9.4
Type=Application
Name=Keyboard mappings for Magicforce 68
Comment=Keyboard mappings for Magicforce 68 by Mat Sims
Exec=/usr/bin/xmodmap ~/.Xmodmap
OnlyShowIn=XFCE;
RunHook=0
StartupNotify=false
Terminal=false
Hidden=false
EOC

You can run xmodmap ~/.Xmodmap anytime to set them. I find that on Mint 19.3 xfce4, after running xmodmap, xfsettingsd starts using too much CPU for an extended period. Give it a minute or so and it does normally calm down but if not, kill it and it should restart and behave.

If you find that you have messed up the keyboard you can get back the original settings with:
xmodmap ~/.Xmodmap-original

Categories
Linux Raspberry Pi

Raspberry PI 2 / 3 with 5″ touchscreen LCD

I managed to get a cheap 5″ LCD HDMI touchscreen from Ebay for my 80’s game emulator. This is an 800×480 panel using an XPT2046 to provide the resistive touch screen, a similar one can be bought here: Raspberry Pi 2 HDMI LCD Screen

A lot of the information on the Internet made it look like getting this screen working with the RPi was going to be a bit of a chore, but I found that out of the box Raspbian Jessie seems to work well with only a few configuration changes.

This screen attaches to the RPi2/3 via a clever 180 degree HDMI connector, and also via the GPIO so it is quite a secure fit. Metal standoffs are also included to keep the LCD and Raspberry Pi safe from harm. You can plug the power either into the power socket on the panel, or the RPI. Powering both screen and RPi from a 2a charger, and a battery pack meant for phone recharging rated at 5200 mAh, 3.7v with 2.1a output worked well.

The RPi is probably set to output video at 640×480, so setting the following in /boot/config.txt forces the 800×480 output:
# Force 800×480 for 5″ lcd display
hdmi_group=2
hdmi_mode=1
hdmi_mode=87
hdmi_cvt=800 480 60 6 0 0 0

The touchscreen didn’t work out of the box either, but adding the following to /boot/config.txt did the trick:
dtparam=spi=on
dtoverlay=ads7846,penirq=25,speed=10000,penirq_pull=2,xohms=150

That got the touchscreen working, but it wasn’t calibrated and there is no right click. The following fixed this:
wget http://github.com/downloads/tias/xinput_calibrator/xinput_calibrator-0.7.5.tar.gz
tar -xvf xinput_calibrator-0.7.5.tar.gz
cd xinput_calibrator-0.7.5.tar.gz
sudo apt-get install libx11-dev libxext-dev libxi-dev x11proto-input-dev
./configure
make
sudo make install

Run the calibration from the Application | System menu, locate all 4 corners and it will output some data, copy the data (starting Section) into the file below. This also includes code to emulate right click with a long press:
su
cat >/usr/share/X11/xorg.conf.d/01-input.conf
Section “InputClass”
Identifier “calibration”
MatchProduct “ADS7846 Touchscreen”
Option “Calibration” “141 4009 196 3966”
Option “EmulateThirdButton” “1”
Option “EmulateThirdButtonTimeout” “750”
Option “EmulateThirdButtonMoveThreshold” “30”
EndSection

Categories
Linux

Dell 1350cnw on Linux

Getting a Dell 1350cnw working on Ubuntu 64bit 13.10 and higher is much more work than it should be.

This colour Laser (LED really) printer looks lovely on paper, small footprint, USB/Wifi/LAN connectivity, reasonable supply costs and great quality. They are also very cheap right now, I got one hardly used from ebay with half full toner and a complete spare toner set for £30! Ok, getting connected to WiFi is a bit of a pain because of the awful text entry system through the printers panel, ensure that once it is connected you allocate it an fixed IP address using Mac address allocation or whatever your DHCP implementation (often in your broadband router if this is at your home) calls it.

Once connected to the Wifi, it works great with Windows machines and probably 32bit Linux (is anyone still using this) but with 64bit Linux it is a bit of a pain, here is what I did to overcome this using the Xerox Phaser 6000B drivers and CUPS – thanks Apple!

I have carried this procedure out on both Ubuntu Mate 15.04 64bit, Ubuntu Studio 15.04-18.04 64bit, Mint 18.3 and 19.3 distributions.

Get the deb file from http://www.support.xerox.com/support/phaser-6010/downloads/enus.html?operatingSystem=linux

unzip xerox-phaser-6000-6010_1.0-1_i386
sudo dpkg --add-architecture i386
sudo apt-get update
sudo apt-get install libc6:i386 libncurses5:i386 
sudo apt-get install libstdc++6:i386 libcupsimage2:i386
sudo dpkg -i xerox-phaser-6000-6010_1.0-1_i386.deb
apt-get -f install
cp /usr/share/ppd/Xerox/Xerox_Phaser_6000B.ppd.gz /tmp
gunzip /tmp/Xerox_Phaser_6000B.ppd.gz

Add your unix username to the lp group:

sudo gpasswd -a  lp
sudo gpasswd -a root lp

DefaultAuthType Negotiate
edit your /etc/cups/cupsd.conf changing DefaultAuthType from Negotiate to Basic.

Point your web browser at Dell 1350cnw on Linux CUPS administration pages: http://localhost:631
You will need to login with your unix username and password.

Under Administration I ticked:

Share printers connected to this system Max client 100
Allow printing from the Internet
Allow remote administration
Allow users to cancel any job
Preserve job history
Maximum jobs 500
Remain metadata Yes
Retain Documents 1d
Save debugging information Max log size: 0

Make sure your printer is on.

Add the printer. 2 Dell 1350cnw’s appeared under Network Printers, I picked: “Dell 1350cnw Color Printer; NIC 17.10,ESS 201008241506 (Dell 1350cnw Color Printer)” and clicked Continue.
I ticked Sharing to Share this printer and Continue.
I ignored the Make / Model, etc and clicked Choose file and pointed to the /tmp/Xerox_Phaser_6000B.ppd file we stored above and clicked Add Printer.

On the next page I clicked Set Default options and that was it.

I was then able to successfully print a test page from CUPS and documents from Libre Office and from Chrome browser.

Categories
Linux

Managing CUPS from outside your home network

The ability to manage CUPS from outside your network (Remote Administration) can save your bacon sometimes. I had to do this when the kids were trying to print something that it wasn’t working.

CUPS is great, thank you Michael Sweet and also Apple, you have done a good job here – and that isn’t something I thought that I’d ever say about Apple.

If you want to manage a printer on one of your Linux machines from outside your network, allow port 631 through your firewall and edit the CUPS config, /etc/cups/cupsd.conf as follows:

In the and sections add Allow 257.257.257.257 after the Order statement. This isn’t a valid IP, you should replace this with the remote IP address, i.e. the public IP address that you will be connecting from.

Also add DefaultEncryption Never in the main section, I put it under the LogLevel statement.

You should then be able to point your web browser at your broadband connections IP_address:631 and get CUPS management. The URL in your web browser should look something like this:

http://257.257.257.257:631

Of course, 257 is not valid, I did that on purpose.

If you are in the UK, consider ICUK for broadband, they have a great network and broadband IP addresses, although dynamic, rarely change – I’ve been with them 5 years and my IP address has not changed. This makes connecting to machines in your own network very convenient.

Categories
Linux

Installing Virtualbox Guest Additions on a Centos 5 guest

wget http://pkgs.repoforge.org/rpmforge-release/rpmforge-release-0.5.3-1.el5.rf.x86_64.rpm
rpm --import http://apt.sw.be/RPM-GPG-KEY.dag.txt
rpm -K rpmforge-release-0.5.3-1.el5.rf.*.rpm
rpm -i rpmforge-release-0.5.3-1.el5.rf.*.rpm

yum --enablerepo rpmforge install dkms
yum install gcc make
yum install kernel-devel

Mount guest additions from the Virtualbox Devices menu (you will need to press right control to free your mouse pointer from the guest.
mkdir /media/cdrom
mount /dev/cdrom /media/cdrom
cd /media/cdrom
./VBoxLinuxAdditions.run